Lets Explore CHIP-8!
Author: glitch Published: 29 February 2020 - Revision: 1.2
Hiya again ♥
As a child I was pretty lonely and I used to pass the time by taking things apart so that I could understand how they work. Recently I've re-discovered the pure joy of taking things apart in order to understand and explore them.
I also love to read about antique electronic platforms and software and I thought that I could explore this a bit by attempting to emulate some antique machines.
CHIP-8 Internals
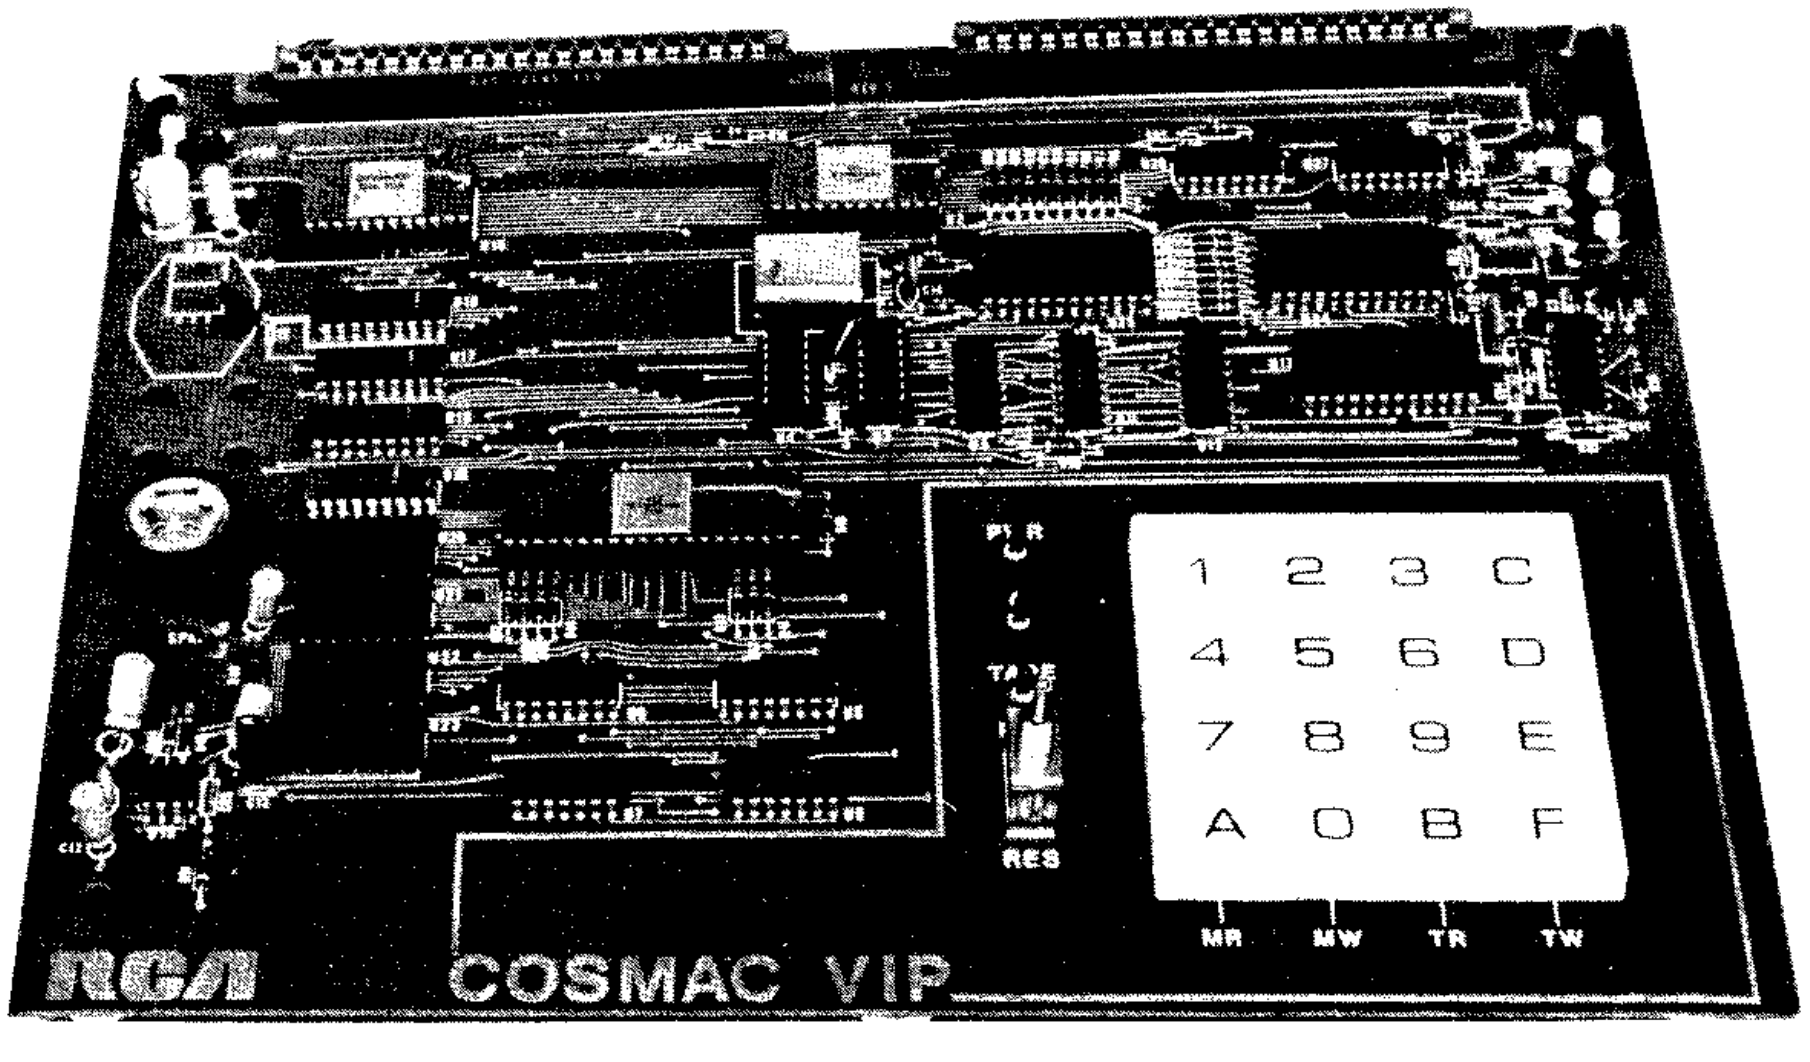
CHIP-8 is a great project for beginners looking for an opportunity to explore systems emulation. CHIP-8 is essentially a VM that runs bytecode, it was developed by Joseph Weisbecker to run on the COSMAC VIP (pictured above) and Telmac 1800 8-bit microcomputers in the mid 1970s. I don't want to get too deep into how to write an emulator because there are tons of better articles out there on this topic. Instead I'd like to give enough of a background so that you can follow the game programming section below. Skip over this section if you are already familiar with CHIP-8.
Input
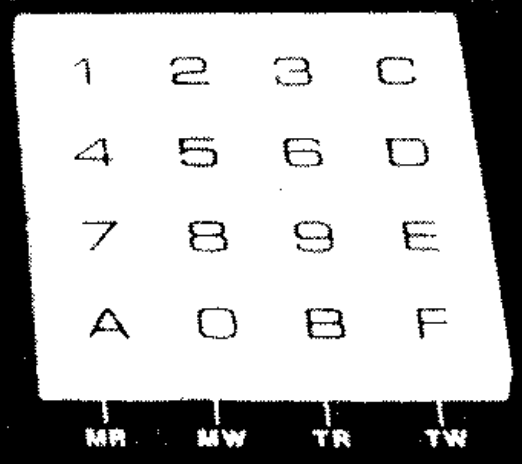
Input for the CHIP-8 is handled by a keypad, which is pictured below. There are 16 keys numbered from 0 to F.
There are just 3 opcodes that handle keypad input:
    EX9E if(key()==Vx)  -> Skips the next instruction if the key stored in VX
                           is pressed.
	EXA1 if(key()!=Vx)  -> Skips the next instruction if the key stored in VX
                           isn't pressed.
	FX0A Vx = get_key() -> A key press is awaited, and then stored in VX.
                           (Blocking Operation. All instruction halted until next
                           key event)
Display
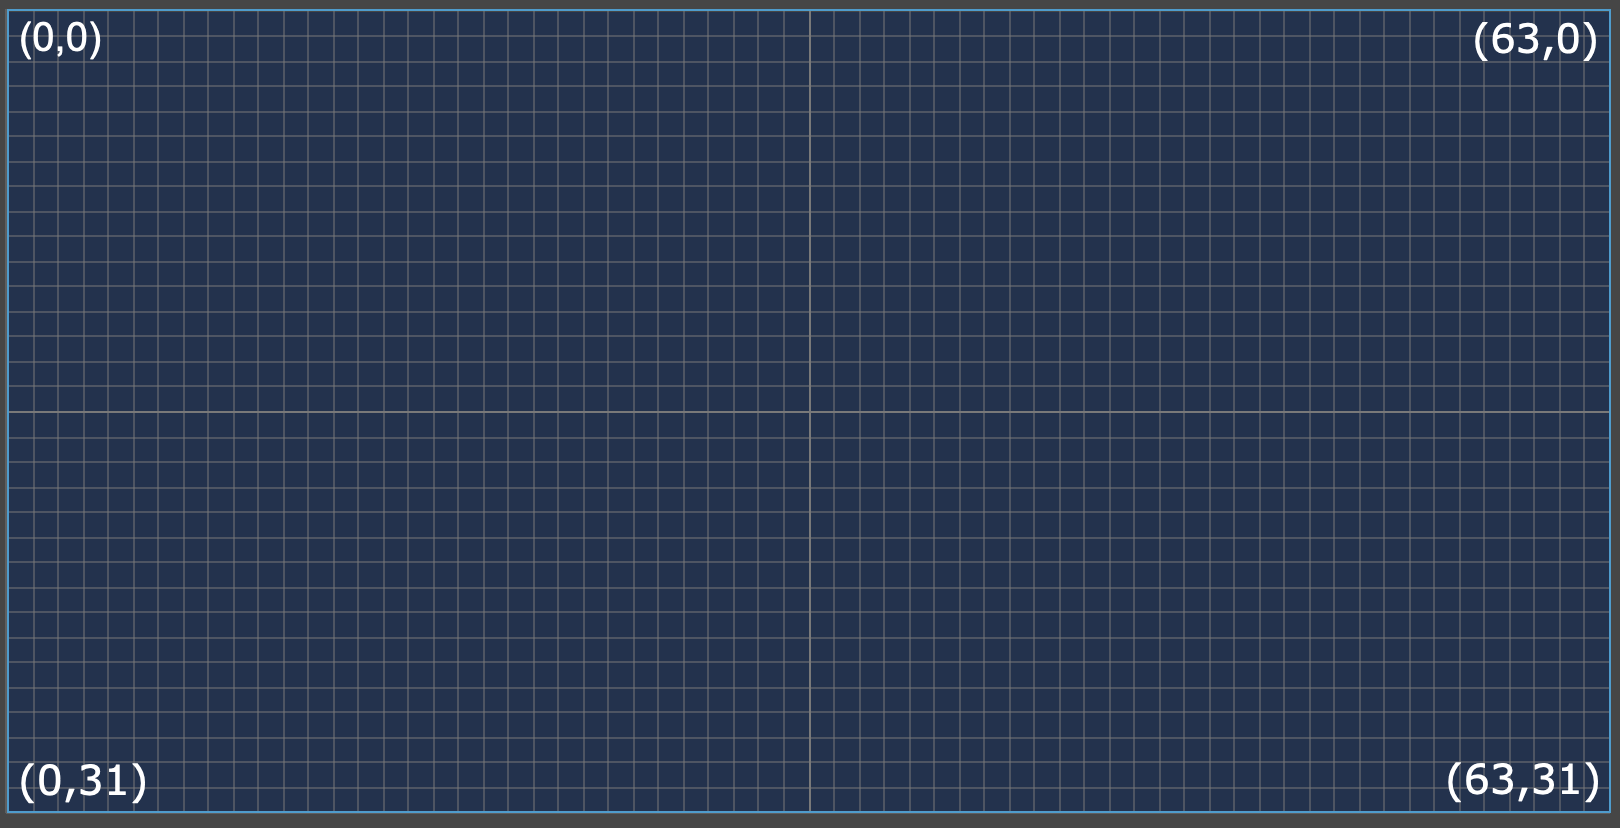
The display is ```64x32``` pixels. The addressing is a little unusual, the top left is ```0,0``` and the bottom right is ```63,31```.
To draw on the screen we use the ```sprite``` instruction to write sprite data to a position on the screen. This write operation is _XOR_, which simply means writing on a pixel that is already lit will make the pixel unlit. The following XOR truth table may help in understanding this concept if you are not already familiar.
    Input 	Output
    A 	B   -
    0 	0 	0
    0 	1 	1
    1 	0 	1
    1 	1 	0
The way that the sprite data gets passed to the draw calls is quite elegant. The starting address of the sprite is passed in the ```I``` register. The length is also passed in. So to draw the digit _2_ for example, you would pass ```0xF0 0x10 0xF0 0x80 0xF0``` and the length ```5``` to the draw call. This would produce the digit 2.
    "2"	  Binary    Hex
    ****  11110000  0xF0
       *  00010000  0x10
    ****  11110000  0xF0
    *     10000000  0x80
    ****  11110000  0xF0
Audio
I didn't implement audio in my emulator because I couldnt find a good cross platform audio library. I'll leave this as an excercise for the curious reader.
Memory
CHIP-8 has 4096 bytes of RAM memory, address range ```0x0 -> 0x200``` is reserved, and it was typically used by the virtual machine interpreter. CHIP-8 programs are loaded into the RAM at offset 0x200. The following diagram from Cowgods technical reference[1] illustrates the memory layout nicely.

Registers
CHIP-8 has 16 8-bit registers ```V0``` to ```VF```. They are all general purpose, but ```VF``` is used as a flags register by some assembly instructions so care must be taken when using it. There is also a special memory address register ```I``` which is 16-bits. This register is used as a pointer to access system memory.
Assembly Language
There are 35 instructions in the CHIP-8 language, I won't describe them all here but they are described well on the wiki article [2] for CHIP-8.
Writing The Emulator
This was pretty uneventful -- however, if you wish to write the emulator from scratch I would recommend using test roms to verify that your emulation is correct. Its very easy to make tiny mistakes that are really difficult to debug, or hit subtle bugs while running the more complex game ROMS.
Initially I used ASCII as the screen, the following screenshot is the game PONG rendering in ASCII. This was enormously helpful in keeping the complexity down and it was helpful for finding early bugs. There is a visible alignment bug here if you look carefully 😬.
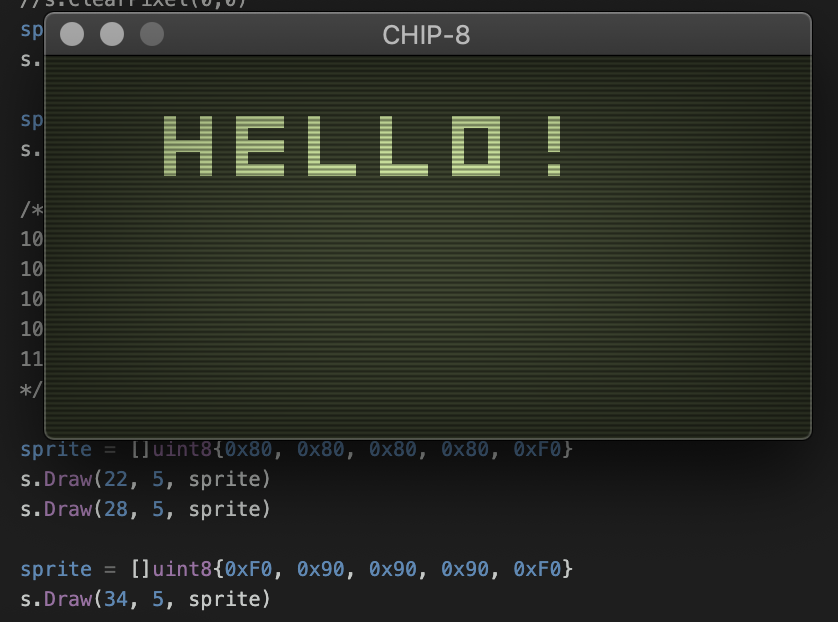
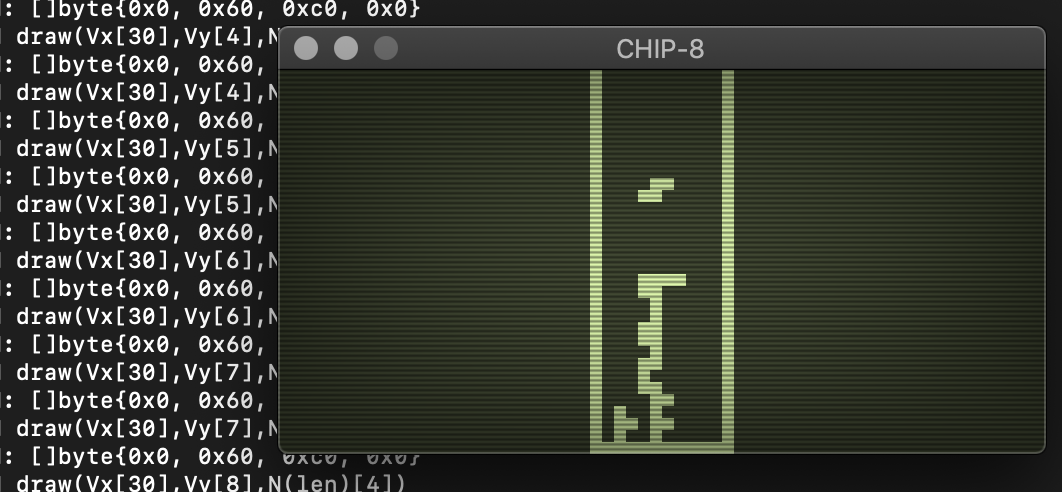
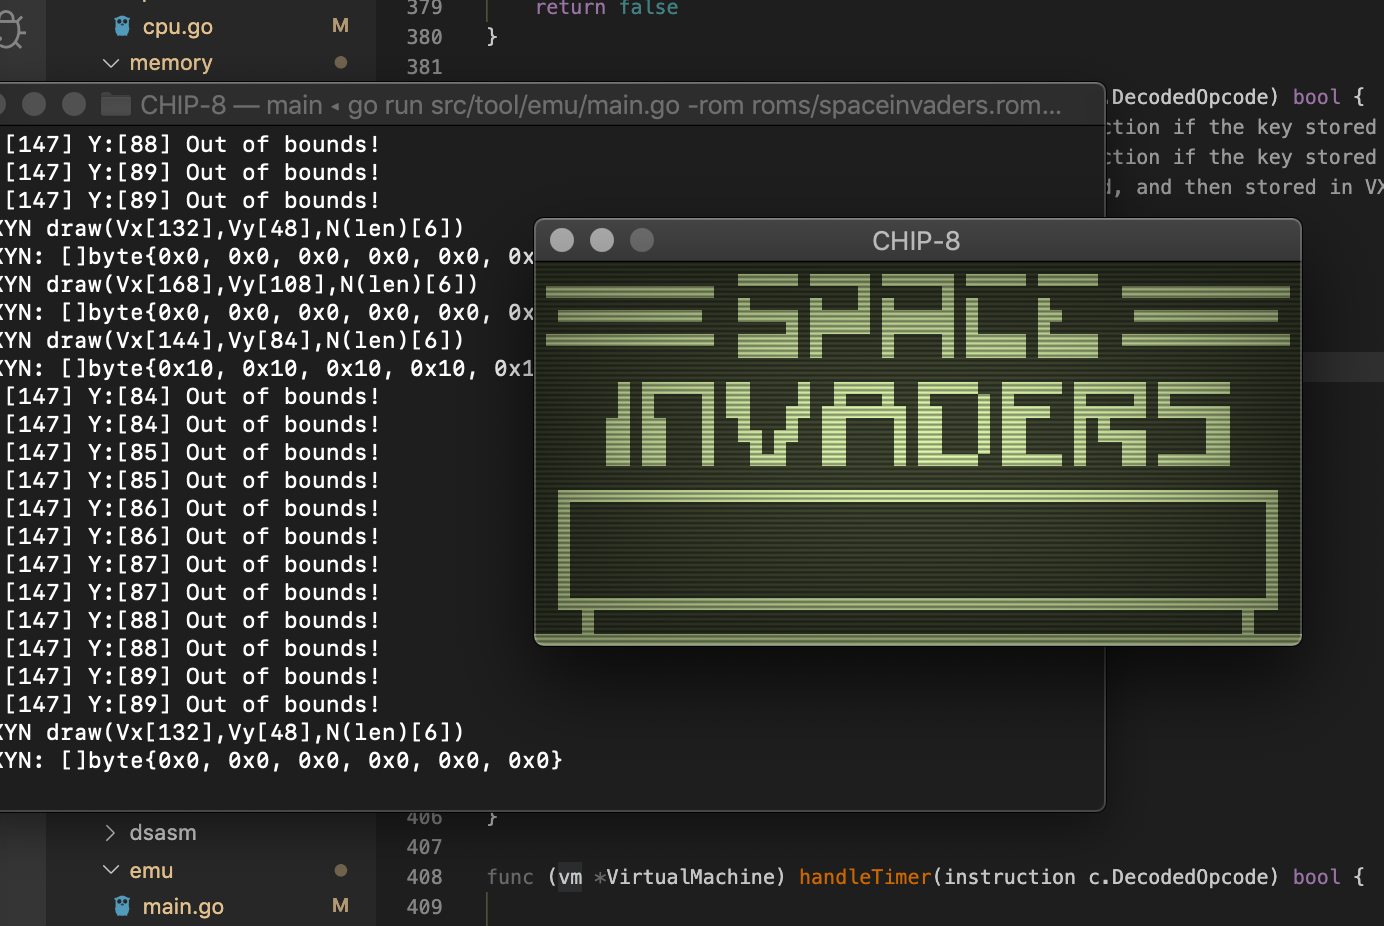
After I implemented the emulator, I spent a little time making a nice screen using the excellent ```go-gl``` and a lovely shader to make the display look like an old CRT. I started with a hello world application, and then tested a few popular antique game ROMs to make sure that the emulator was working.
Hello World
Tetris
Space Invaders
Writing Snake For CHIP-8
For convenience (and because I didn't have time to write an assembler) I used the excellent CHIP-8 Octo assembler. It has lots of nice macros, and a lovely syntax that makes it feel a little closer to a higher level language.
Game loop
Most games have a game loop, and snake is no exception, the Octo syntax for an infinite loop is as follows.
        loop

        again
Inside this loop we want to save the snakes head position on each cycle, we need to do this because the current head will eventually become the tail and we will need to delete the last segment of the tail. We will also do collisions checks, and get user input. It will look something like this:
        loop
            # get input
            # save head position
            # check collisions
        again
Stack Or Memory Buffer
We will need memory to store and load positions for the segments of the snake. CHIP-8 does have a stack, but it is not directly accessible via instructions so we will need to make a new data structure.

A stack would work but we have pretty strict memory limits. Instead I went with a circular buffer that is 256 bytes long. If we use an 8-bit offset from the base it will wrap around instead of extending memory past the 256 byte chunk. I marked the base of this memory snake_mem_base.
To use this memory structure I wrote two small routines, push_head_pos_v0_v1 and get_tail_pos_v0_v1.
    : push_head_pos_v0_v1
	    i := snake_mem_base
	    i += HEAD_PTR
	    TO_STORE_X := SNAKE_HEAD_X
	    TO_STORE_Y := SNAKE_HEAD_Y
	    save v1                    # save v0, and v1 which is the snake head
	    HEAD_PTR += SNAKE_SEG_SIZE
	    return
push_head_pos_v0_v1 puts the snake x, and y position into the v0 and v1 registers and then saves them into our memory structure. It then moves the pointer forward to point to the current data.
    : get_tail_pos_v0_v1
        TEMP_REG := HEAD_PTR
        TEMP_REG -= SNAKE_LEN
        i := snake_mem_base
        i += TEMP_REG
        load v1
        return
get_tail_pos_v0_v1 calculates where the position of the snake tail segment would be by subtracting the length of the snake from the current snake head data. It then loads this position into the v0 and v1 registers.
Sprites
The sprites are hilariously simple, they are just one pixel. I could have used the same memory address for all of the sprites in the game-- but I broke them up so that the code would be easier to follow.
    : snake_seg
        0x01

    : food_sprite
        0x01

    : wall_sprite
        0x01
Handle Input
I handled input directly inside of the main game loop -- this is quite messy and if I had more time I would move this into a routine. Octo assembler has a nice feature that allows you to make aliases for things. I made a couple convenient aliases to make the code a little more readable.
    :const DIR_UP 0
	:const DIR_RIGHT 1
	:const DIR_LEFT 2
	:const DIR_DOWN 3

    ...
    ...

	:alias KEYB_UP v4     #v4 -v7 registers
	:alias KEYB_RIGHT v5
	:alias KEYB_LEFT v6
	:alias KEYB_DOWN v7

    ...
    ...

	KEYB_UP := 2 # up       (2)
	KEYB_RIGHT := 4 # right (e)
	KEYB_LEFT := 6 # left   (q)
	KEYB_DOWN := 5 # down   (w)
The code itself just assigns directions based on whether a key is pressed.
		# handle direction input
		if KEYB_UP key then CURRENT_DIR := DIR_UP
		if KEYB_RIGHT key then CURRENT_DIR := DIR_RIGHT
		if KEYB_LEFT key then CURRENT_DIR := DIR_LEFT
		if KEYB_DOWN key then CURRENT_DIR := DIR_DOWN
And then later, when we update the snake head position we use the CURRENT_DIR variable to decide how to adjust the X and Y coordinates.
		# adjust sprite coords
		if CURRENT_DIR == DIR_UP then SNAKE_HEAD_Y += -1
		if CURRENT_DIR == DIR_RIGHT then SNAKE_HEAD_X += -1
		if CURRENT_DIR == DIR_LEFT then SNAKE_HEAD_X += 1
		if CURRENT_DIR == DIR_DOWN then SNAKE_HEAD_Y += 1
Handle Death
Due to the time constraints I decided to simply exit the game into an infinite loop when the player dies. I've seen this in some early mobile implementations of snake.
    : die
        loop
	    again
Handle Food
The food pellets need to be drawn around the level, I used the built in PRNG to generate random positions and then just corrected positions that occured outside of the level.
    : place_food
        FOOD_X := random MAX_X
        FOOD_Y := random MAX_Y
	    if FOOD_X == 0 then FOOD_X := 1
	    if FOOD_X == MAX_X then FOOD_X += -1
	    if FOOD_Y == 0 then FOOD_Y := 1
	    if FOOD_Y == MAX_Y then FOOD_Y += -1

	    i := food_sprite
	    sprite FOOD_X FOOD_Y 1
	    return
Collision Detection
The collision detection code was the most interesting to me. When a pixel draws over a pixel that is already lit, the ```VF``` register gets set. We can use this to detect when pixels overlap (which indicates a collision occured).
        # the snake will overwrite itself if backtrack
		# occurs which sets VF to 1. We can use this to
		# check opposite direction deaths
		if FLAGS_REG == FLAG_SET begin

			TEMP_REG := 0
			FLAGS_REG := FLAG_UNSET

			TO_STORE_X := 0x0F
			TO_STORE_X &= SNAKE_HEAD_X

			TO_STORE_Y := 0x0F
			TO_STORE_Y &= FOOD_X

		  if TO_STORE_X == TO_STORE_Y then TEMP_REG += 1

			TO_STORE_X := 0x0F
			TO_STORE_X &= SNAKE_HEAD_Y

			TO_STORE_Y := 0x0F
			TO_STORE_Y &= FOOD_Y

		  if TO_STORE_X == TO_STORE_Y then TEMP_REG += 1
			if TEMP_REG == 2 begin
				SNAKE_LEN += SNAKE_SEG_SIZE
				push_head_pos_v0_v1
				place_food
			else
				die
			end
		end
For collisions with the walls, I just used the measurements of the level.
    : check_wall_crash_death
        if SNAKE_HEAD_X < MIN_X then die
        if SNAKE_HEAD_X > MAX_X then die
        if SNAKE_HEAD_Y < MIN_Y then die
        if SNAKE_HEAD_Y > MAX_Y then die
        return
That is pretty much it, I will include all of the code below in case you want to add features.
Bug in assembler, patching ROM
Before I show a GIF of the final ROM, I'd like to share a pretty funny anecdote. After assembling my game it _would not_ work. I spent quite a long time carefully digging through my emulator and my game code. Eventually, I discovered the problem -- there is a bug in the Octo _assembler_!
The game code works fine when running in the Octo emulator, but if you download the assembled ROM and then upload and disassemble it -- the defect is clear.
The following routine, in Octo assembly syntax is supposed to draw one wall.
    : build_walls
        i := wall_sprite
        # top
        TO_STORE_X := 0 # use these temporariy
        TO_STORE_Y := 0 # use these temporariy
        loop
            TO_STORE_X += 1
            while TO_STORE_X < 49
            sprite TO_STORE_X TO_STORE_Y 1
        again
When this is converted to CHIP-8 assembly, generated by Octo it looks like the following:
    : sub-0
	i := label-3
	v0 := 0x00
	v1 := 0x00
	loop
		v0 += 0x01
		vF := 0x31
		vF =- v0
		if vF != 0x00 then
		jump label-5
		sprite v0 v1 0x01
	again
The important part here is the line if vF != 0x00 then. This is the opposite to what it is supposed to be doing. The disassembled code above breaks out of the loop immediately because vF is never equals 0x00 on the first iteration. I opened the ROM inside of a hexeditor and I could see the bug clearly.
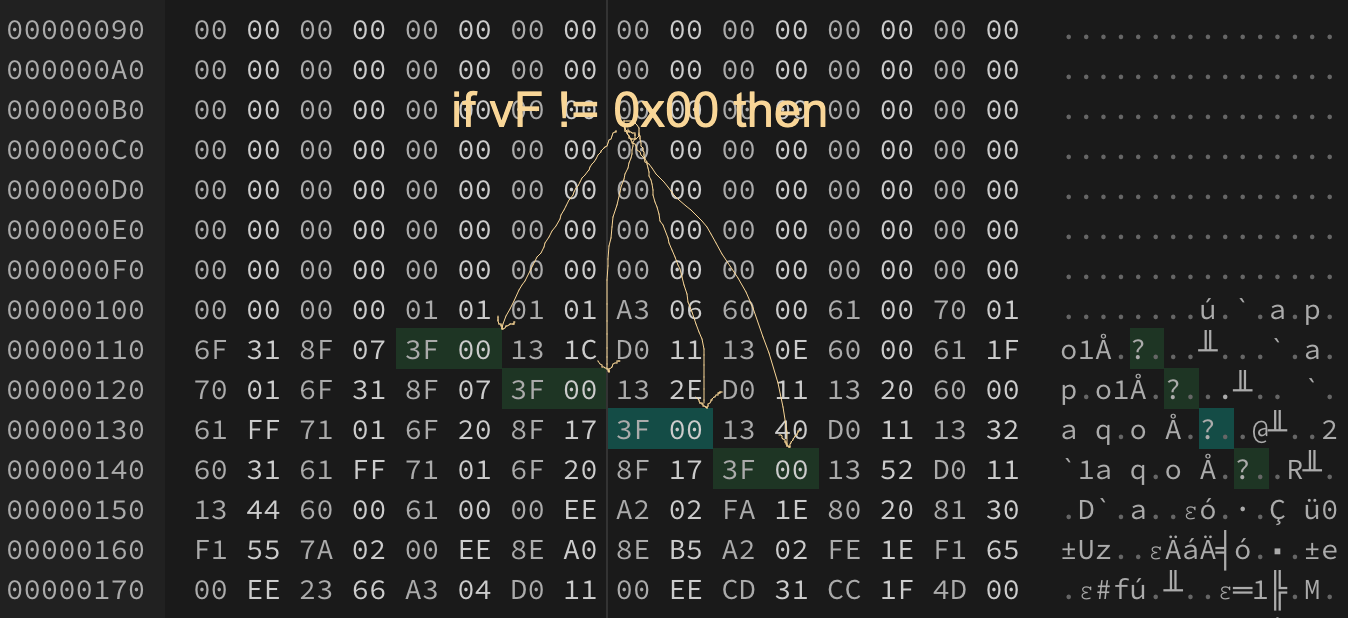
These bytes are wrong! 3F 00 should be 4F 00, as per the documentation below.
    3XNN 	Cond 	if(Vx==NN) 	Skips the next instruction if VX equals NN.
    4XNN 	Cond 	if(Vx!=NN) 	Skips the next instruction if VX doesn't equal NN.
I patched these bytes in the ROM with the hexeditor. The missing wall in the image below is because one of the byte sequences is still 3F 00.
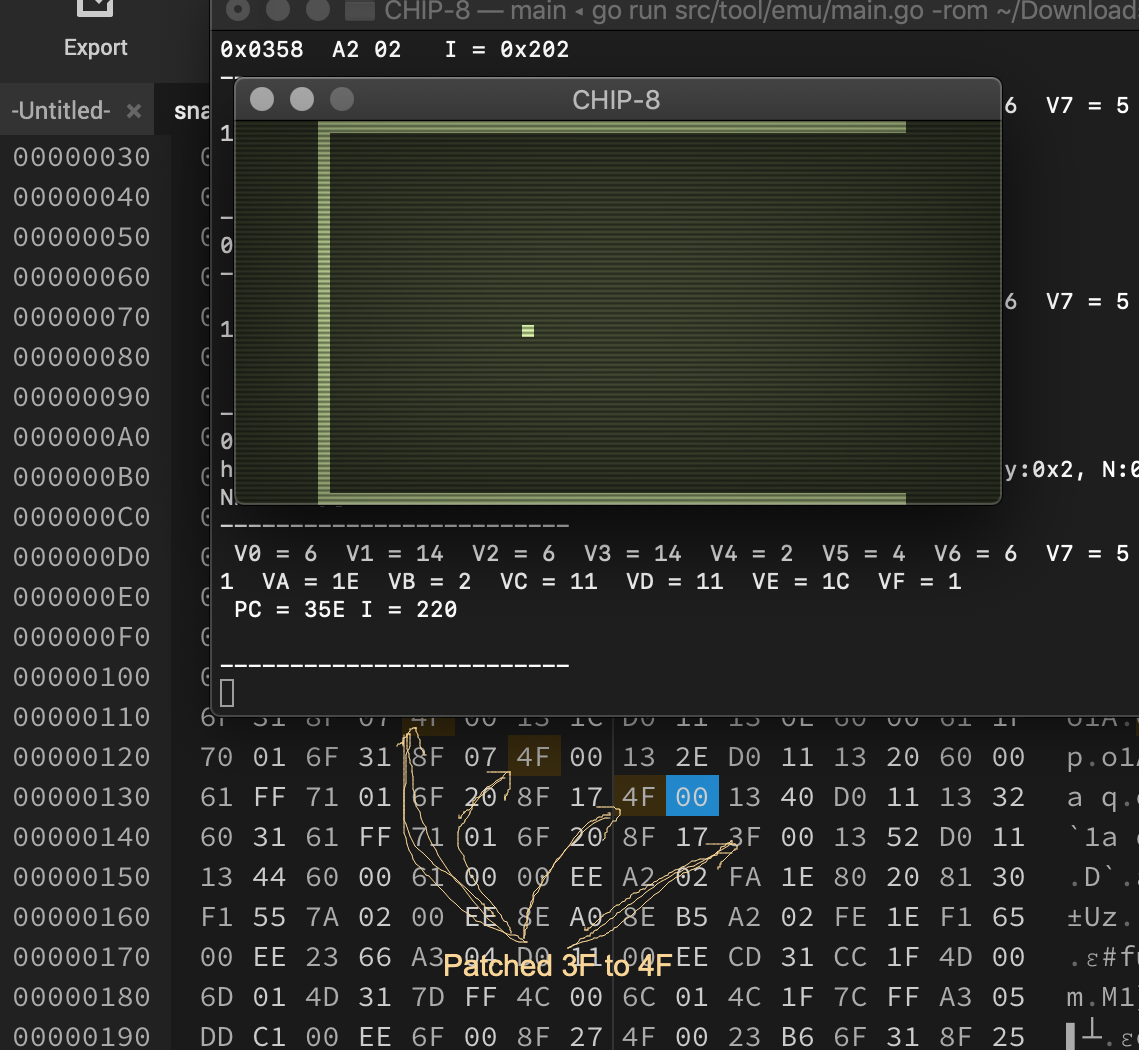
I patched the remaining 3F 00 sequences and saved the ROM. I loaded it in my eumulator and it worked!
Viola!
Game Source Code
This is the complete sourcecode, which assembles to 560 bytes. This could be heavily optimized if you want a nice challenge. How small can you make this ROM?
    ###########################################
    #
    #  S N E K
    #
    #  Classic game SNEK made for CHIP-8 by
    #  glitch.
    #
    #  Press 2/W/Q/E to move the snek
    #
    ###########################################
    : snake_mem_base
    0x00 0x00 0x00 0x00 0x00 0x00 0x00 0x00
    0x00 0x00 0x00 0x00 0x00 0x00 0x00 0x00 #16
    0x00 0x00 0x00 0x00 0x00 0x00 0x00 0x00
    0x00 0x00 0x00 0x00 0x00 0x00 0x00 0x00 #32
    0x00 0x00 0x00 0x00 0x00 0x00 0x00 0x00
    0x00 0x00 0x00 0x00 0x00 0x00 0x00 0x00 #48
    0x00 0x00 0x00 0x00 0x00 0x00 0x00 0x00
    0x00 0x00 0x00 0x00 0x00 0x00 0x00 0x00 #64
    0x00 0x00 0x00 0x00 0x00 0x00 0x00 0x00
    0x00 0x00 0x00 0x00 0x00 0x00 0x00 0x00 #80
    0x00 0x00 0x00 0x00 0x00 0x00 0x00 0x00
    0x00 0x00 0x00 0x00 0x00 0x00 0x00 0x00 #96
    0x00 0x00 0x00 0x00 0x00 0x00 0x00 0x00
    0x00 0x00 0x00 0x00 0x00 0x00 0x00 0x00 #112
    0x00 0x00 0x00 0x00 0x00 0x00 0x00 0x00
    0x00 0x00 0x00 0x00 0x00 0x00 0x00 0x00 #128
    0x00 0x00 0x00 0x00 0x00 0x00 0x00 0x00
    0x00 0x00 0x00 0x00 0x00 0x00 0x00 0x00 #144
    0x00 0x00 0x00 0x00 0x00 0x00 0x00 0x00
    0x00 0x00 0x00 0x00 0x00 0x00 0x00 0x00 #160
    0x00 0x00 0x00 0x00 0x00 0x00 0x00 0x00
    0x00 0x00 0x00 0x00 0x00 0x00 0x00 0x00 #176
    0x00 0x00 0x00 0x00 0x00 0x00 0x00 0x00
    0x00 0x00 0x00 0x00 0x00 0x00 0x00 0x00 #192
    0x00 0x00 0x00 0x00 0x00 0x00 0x00 0x00
    0x00 0x00 0x00 0x00 0x00 0x00 0x00 0x00 #208
    0x00 0x00 0x00 0x00 0x00 0x00 0x00 0x00
    0x00 0x00 0x00 0x00 0x00 0x00 0x00 0x00 #224
    0x00 0x00 0x00 0x00 0x00 0x00 0x00 0x00
    0x00 0x00 0x00 0x00 0x00 0x00 0x00 0x00 #240
    0x00 0x00 0x00 0x00 0x00 0x00 0x00 0x00
    0x00 0x00 0x00 0x00 0x00 0x00 0x00 0x00 #256

    : food_location
    0x00 0x00 # v0 v1

    : snake_seg
    0x01

    : food_sprite
    0x01

    : wall_sprite
    0x01

    : padding
    0x01

    :alias TO_STORE_X v0
    :alias TO_STORE_Y v1
    :alias SNAKE_HEAD_X v2
    :alias SNAKE_HEAD_Y v3

    :alias KEYB_UP v4
    :alias KEYB_RIGHT v5
    :alias KEYB_LEFT v6
    :alias KEYB_DOWN v7
    :alias KEYB_EXTEND v8

    :alias CURRENT_DIR v9
    :alias HEAD_PTR vA
    :alias SNAKE_LEN vB

    :alias FOOD_Y vC
    :alias FOOD_X vD

    :alias TEMP_REG vE
    :alias FLAGS_REG vF

    :const DIR_UP 0
    :const DIR_RIGHT 1
    :const DIR_LEFT 2
    :const DIR_DOWN 3

    :const FLAG_SET 1
    :const FLAG_UNSET 0

    :const SNAKE_SEG_SIZE 2

    :const MIN_X 0
    :const MAX_X 49
    :const MIN_Y 0
    :const MAX_Y 31

    : build_walls
        i := wall_sprite
        # top
        TO_STORE_X := 0 # use these temporariy
        TO_STORE_Y := 0 # use these temporariy
        loop
            TO_STORE_X += 1
            while TO_STORE_X < 49
            sprite TO_STORE_X TO_STORE_Y 1
        again

        # bottom
        TO_STORE_X := 0 # use these temporariy
        TO_STORE_Y := 31 # use these temporariy
        loop
            TO_STORE_X += 1
            while TO_STORE_X < 49
            sprite TO_STORE_X TO_STORE_Y 1
        again

        # left
        TO_STORE_X := 0 # use these temporariy
        TO_STORE_Y := -1 # use these temporariy
        loop
            TO_STORE_Y += 1
            while TO_STORE_Y < 32
            sprite TO_STORE_X TO_STORE_Y 1
        again

        # right
        TO_STORE_X := 49 # use these temporariy
        TO_STORE_Y := -1 # use these temporariy
        loop
            TO_STORE_Y += 1
            while TO_STORE_Y < 32
            sprite TO_STORE_X TO_STORE_Y 1
        again

        TO_STORE_X := 0
        TO_STORE_Y := 0

        return


    : push_head_pos_v0_v1
        i := snake_mem_base
        i += HEAD_PTR
        TO_STORE_X := SNAKE_HEAD_X
        TO_STORE_Y := SNAKE_HEAD_Y
        save v1 # save v0, and v1 which is the snake head
        HEAD_PTR += SNAKE_SEG_SIZE
        return

    : get_tail_pos_v0_v1
        TEMP_REG := HEAD_PTR
        TEMP_REG -= SNAKE_LEN
        i := snake_mem_base
        i += TEMP_REG
        load v1
        return

    : delete_tail_v0_v1
        get_tail_pos_v0_v1
        i := snake_seg
        sprite v0 v1 1 # delete last segment
        return

    : place_food
        FOOD_X := random MAX_X
        FOOD_Y := random MAX_Y
            if FOOD_X == 0 then FOOD_X := 1
            if FOOD_X == MAX_X then FOOD_X += -1
            if FOOD_Y == 0 then FOOD_Y := 1
            if FOOD_Y == MAX_Y then FOOD_Y += -1

            i := food_sprite
            sprite FOOD_X FOOD_Y 1
            return

    : check_wall_crash_death
        if SNAKE_HEAD_X < MIN_X then die
        if SNAKE_HEAD_X > MAX_X then die
        if SNAKE_HEAD_Y < MIN_Y then die
        if SNAKE_HEAD_Y > MAX_Y then die
        return

    : die
        loop
            again

    ###
    : main
        SNAKE_LEN := SNAKE_SEG_SIZE

        SNAKE_HEAD_Y := 20
    SNAKE_HEAD_X := 20

        # keyboard map
        KEYB_UP := 2 # up
        KEYB_RIGHT := 4 # right
        KEYB_LEFT := 6 # left
        KEYB_DOWN := 5 # down (w)
        KEYB_EXTEND := 1 # extend snake

        # start the snake off going forward, and initialize
        # the snake state with 2 bytes

        TO_STORE_X := SNAKE_HEAD_X
        TO_STORE_Y := SNAKE_HEAD_Y
        push_head_pos_v0_v1

        # set the initial direction
        CURRENT_DIR := DIR_RIGHT


        build_walls
        place_food

        # game loop
    loop

            # handle direction input
            if KEYB_UP key then CURRENT_DIR := DIR_UP
            if KEYB_RIGHT key then CURRENT_DIR := DIR_RIGHT
            if KEYB_LEFT key then CURRENT_DIR := DIR_LEFT
            if KEYB_DOWN key then CURRENT_DIR := DIR_DOWN

            # adjust sprite coords
            if CURRENT_DIR == DIR_UP then SNAKE_HEAD_Y += -1
            if CURRENT_DIR == DIR_RIGHT then SNAKE_HEAD_X += -1
            if CURRENT_DIR == DIR_LEFT then SNAKE_HEAD_X += 1
            if CURRENT_DIR == DIR_DOWN then SNAKE_HEAD_Y += 1

            # save current
            push_head_pos_v0_v1

            # Set VF to 01 if any set pixels are changed to
            # unset, and 00 otherwise
            i := snake_seg
            FLAGS_REG := FLAG_UNSET
            sprite SNAKE_HEAD_X SNAKE_HEAD_Y 1

            # the snake will overwrite itself if backtrack
            # occurs which sets VF to 1. We can use this to
            # check opposite direction deaths
            if FLAGS_REG == FLAG_SET begin

                TEMP_REG := 0
                FLAGS_REG := FLAG_UNSET

                TO_STORE_X := 0x0F
                TO_STORE_X &= SNAKE_HEAD_X

                TO_STORE_Y := 0x0F
                TO_STORE_Y &= FOOD_X

            if TO_STORE_X == TO_STORE_Y then TEMP_REG += 1

                TO_STORE_X := 0x0F
                TO_STORE_X &= SNAKE_HEAD_Y

                TO_STORE_Y := 0x0F
                TO_STORE_Y &= FOOD_Y

            if TO_STORE_X == TO_STORE_Y then TEMP_REG += 1

                if TEMP_REG == 2 begin
                    SNAKE_LEN += SNAKE_SEG_SIZE
                    push_head_pos_v0_v1
                    place_food
                else
                    die
                end

            end

            check_wall_crash_death

            delete_tail_v0_v1
        again
Emulator Source Code
I've released the sourcecode for my implementation of the CHIP-8 emulator as well, as with all of these articles -- I am very limited on time and the code is sketch or proof of concept quality code. CHIPPY Source
References
| No. | Reference Description | Link |
|---|---|---|
| 1 | Octo Assembler | link |
| 2 | CHIP-8 Assembly | link |
| 3 | More CHIP-8 Assembly | link |
| 4 | CHIP-8 Opcode Table | link |
| 5 | Cool Online Hex Editor | link |